Getting Started
Reading and writing
Reading and writing images is done using plain OpenCV:
import cv2 as cv

image = cv.imread("path/to/infile")
cv.imwrite("path/to/outfile", image)
Reading videos, however, is a bit more tedious in OpenCV. We therefore have a more pythonic approach, using OpenCV Wrapper:
import cv2 as cv
import opencv_wrapper as cvw

with cvw.load_video("path/to/file") as video:
    for frame in cvw.read_frames(video):
        cv.imshow("Frame", frame)
        cvw.wait_key(1)
read_frames also has start, stop and step parameters, that work the same way as Pythons built-in range.
Larger Example - Rotate A Color Wheel
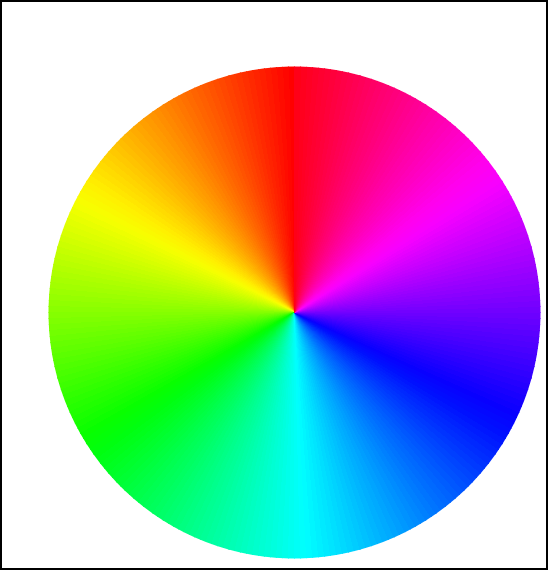
Say we have the following color wheel image, which we want to rotate.
We of course want to rotate it at it’s center, which is not in the center of the image. A possible solution using OpenCV would be:
import cv2 as cv
import random

img = cv.imread("resources/color_wheel_invert.png")
gray = cv.cvtColor(img, cv.COLOR_BGR2GRAY)
_, otsu = cv.threshold(gray, 250, 255, cv.THRESH_BINARY_INV)
_, contours, _ = cv.findContours(otsu, cv.RETR_EXTERNAL, cv.CHAIN_APPROX_SIMPLE)
contour = contours[0]
rect = cv.boundingRect(contour)  # Gives a tuple (x, y, w, h)
x, y, w, h = rect

color = [random.randint(0, 255) for _ in range(3)]

degrees = 60
center = (x + w / 2), (y + h / 2)
rotation_matrix = cv.getRotationMatrix2D(center, degrees, 1)
rotated_image = cv.warpAffine(img, rotation_matrix, gray.shape[::-1])

cv.rectangle(rotated_image, (x, y), (x + w, y + h), color)

cv.imshow("Image", rotated_image)
cv.waitKey(0)
We first convert the image to gray scale. The color wheel in gray scale does not contain any values of pure white. We can therefore threshold the image at a high threshold, to segment the color wheel.
We then find contours in the image (which in this case only will be one contour), and find the bounding rectangle enclosing the contour. From this rectangle we can find the center point by the means of the top left corner, the height and width. We use this to create a rotation matrix, and call the affine warp function. Lastly, we draw a rectangle around the found contour. This is just for viewing pruposes.
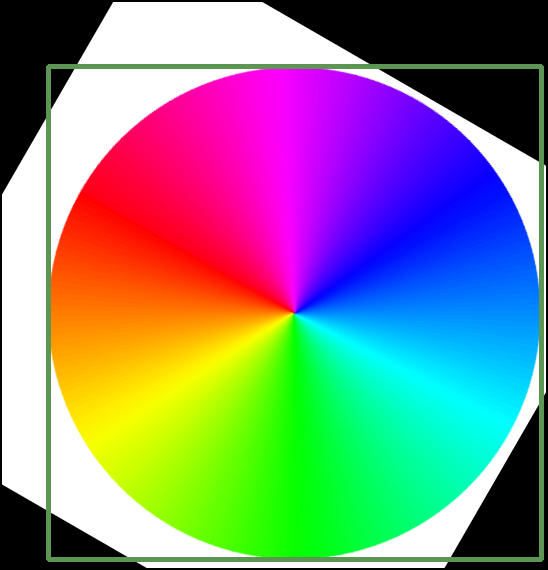
We get the following result.
Although a perfectly fine solution, there are a lot of things that can be simplified. We also cannot help but rotate the whole image. Here is a solution using opencv_wrapper:
import cv2 as cv
import opencv_wrapper as cvw

img = cv.imread("resources/color_wheel_invert.png")
gray = cvw.bgr2gray(img)
otsu = cvw.threshold_binary(gray, 250, inverse=True)
contours = cvw.find_external_contours(otsu)
contour = contours[0]
rect = contour.bounding_rect  # Gives a Rect object
degrees = 60

center = rect.center  # Gives a Point object
top_left = rect.tl  # Gives a Point object
new_center = center - top_left
img[rect.slice] = cvw.rotate_image(
    img[rect.slice], new_center, degrees, unit=cvw.AngleUnit.DEGREES
)
cvw.rectangle(img, rect, cvw.Color.RANDOM)

cv.imshow("Image", img)
cvw.wait_key(0)
We again follow the same approach. However, with the Contour class, we can simply call the bounding rect property. This yields a Rect object, which has a center property. Convenient.
Where we before were left with no (obvious) choice but to rotate the whole image, we can now simply slice the image at the rectangle, only rotating the figure itself. For this exact purpose, it doesn’t make much difference, but it is a demonstration. We find the new center from which to rotate, and simply call the rotate image function. We can here choose whether to use degrees or radians. Lastly we draw a rectangle with a random color.
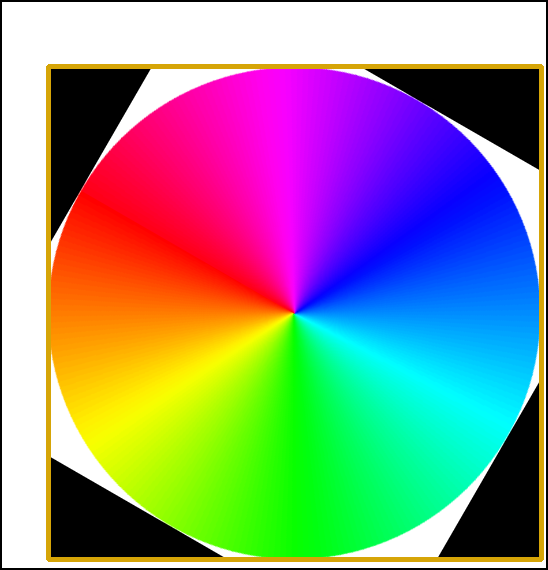
We get the following result.
Not only is this a tad less tedious to write, but we are also easily able to rotate only the relevant part of the circle by slicing [1]. The contour, rectangle and point objects are also an ease to work with.
### Other Area of Ease While not providing examples, there are many other parts of the OpenCV that become an ease to work with, when using opencv_wrapper. Areas include
- Morphology
- Image normalization
- Color conversion
- Thresholding
- Image smoothing
| [1] | Disclosure: The slicing is not that hard to accomplish, from x, y, w, h. We can create it like this: our_slice = (slice(y, y+h), slice(x, x+w))
|